
Your words.
Your website.
One simple flow.
Tell your agent what to change. Check the preview. Publish only when you’re happy.
Download agent instructionsFor WorkBuddy, Codex & Claude Code · Markdown file (.md)
Attach it for initial setup. After connecting, your agent gets current editing rules directly from Publisher.
From request to live page
You make the decisions.
Your agent handles the changes.
Share & connect
First-time setupOpen WorkBuddy, Codex or Claude Code. Share the downloaded instructions and name your website. For WorkBuddy, open the WorkBuddy section for illustrated setup in English or Chinese. Your agent uses the approved connection details and checks your website access.
In the app: Attach the downloaded .md file to your message, then paste the starter message above.
In a local terminal session: Give the agent the full path to the downloaded .md file and ask it to read and follow it. Then send the starter message above. Write this in the agent conversation, not at the shell prompt.
If prompted, complete your organization’s sign-in yourself. Never paste passwords or sign-in codes into chat.
Describe your change
In your own wordsShare the page link and say exactly what should change. Add the final text, image or document if needed. English or Chinese both work.
“On this page, replace the headline with ‘Our latest research’. Leave the rest unchanged.”
Open the preview
Not live yetYour agent sends a preview link to the changed page. Check the text, images and links. Ask for corrections in the same conversation.
Ask for a one-click link to the exact page. If the connection cannot provide one, your agent should explain the limitation before asking you to approve.
Approve & publish
Only with your approvalAfter reviewing this exact preview, say “Publish it” in the same chat. The agent publishes, checks the live page and sends you its link. No extra publisher confirmation window is required; without your approval, it does not publish.
“I approve this preview. Publish it.”
Edit company websites with WorkBuddy
Download the guide and attach it to your conversation. Check access, review the preview, then decide when to publish.
Before you start: you need a WorkBuddy enterprise account enabled by IT and permission to edit the website. These are separate permissions; downloading the guide does not grant access. Already signed in to WorkBuddy? Start at step 3.
Install the company’s WorkBuddy client
Install the China edition from the company-approved download page: Download WorkBuddy. Choose Mac or Windows for your computer.
Contact IT (Jie Xu) if your enterprise license has not been enabled. The interface language alone does not tell you which edition you have.
Sign in with your company account
Open the client and choose Sign In → Enterprise → Authorize Login (登录 → 企业 → 授权登录). In the browser, choose SSO, then Enterprise domain login (企业域名登录), and enter:
insilicomedicineEnter only the company domain above, without @ or an email suffix. Review the displayed agreements, then continue to the enterprise sign-in page and complete Microsoft company sign-in. Use the email address IT enabled for you, then return to WorkBuddy. The browser sign-in page may still show Chinese labels.
This signs you in to WorkBuddy. The website editing tools may ask you to sign in separately in step 4.
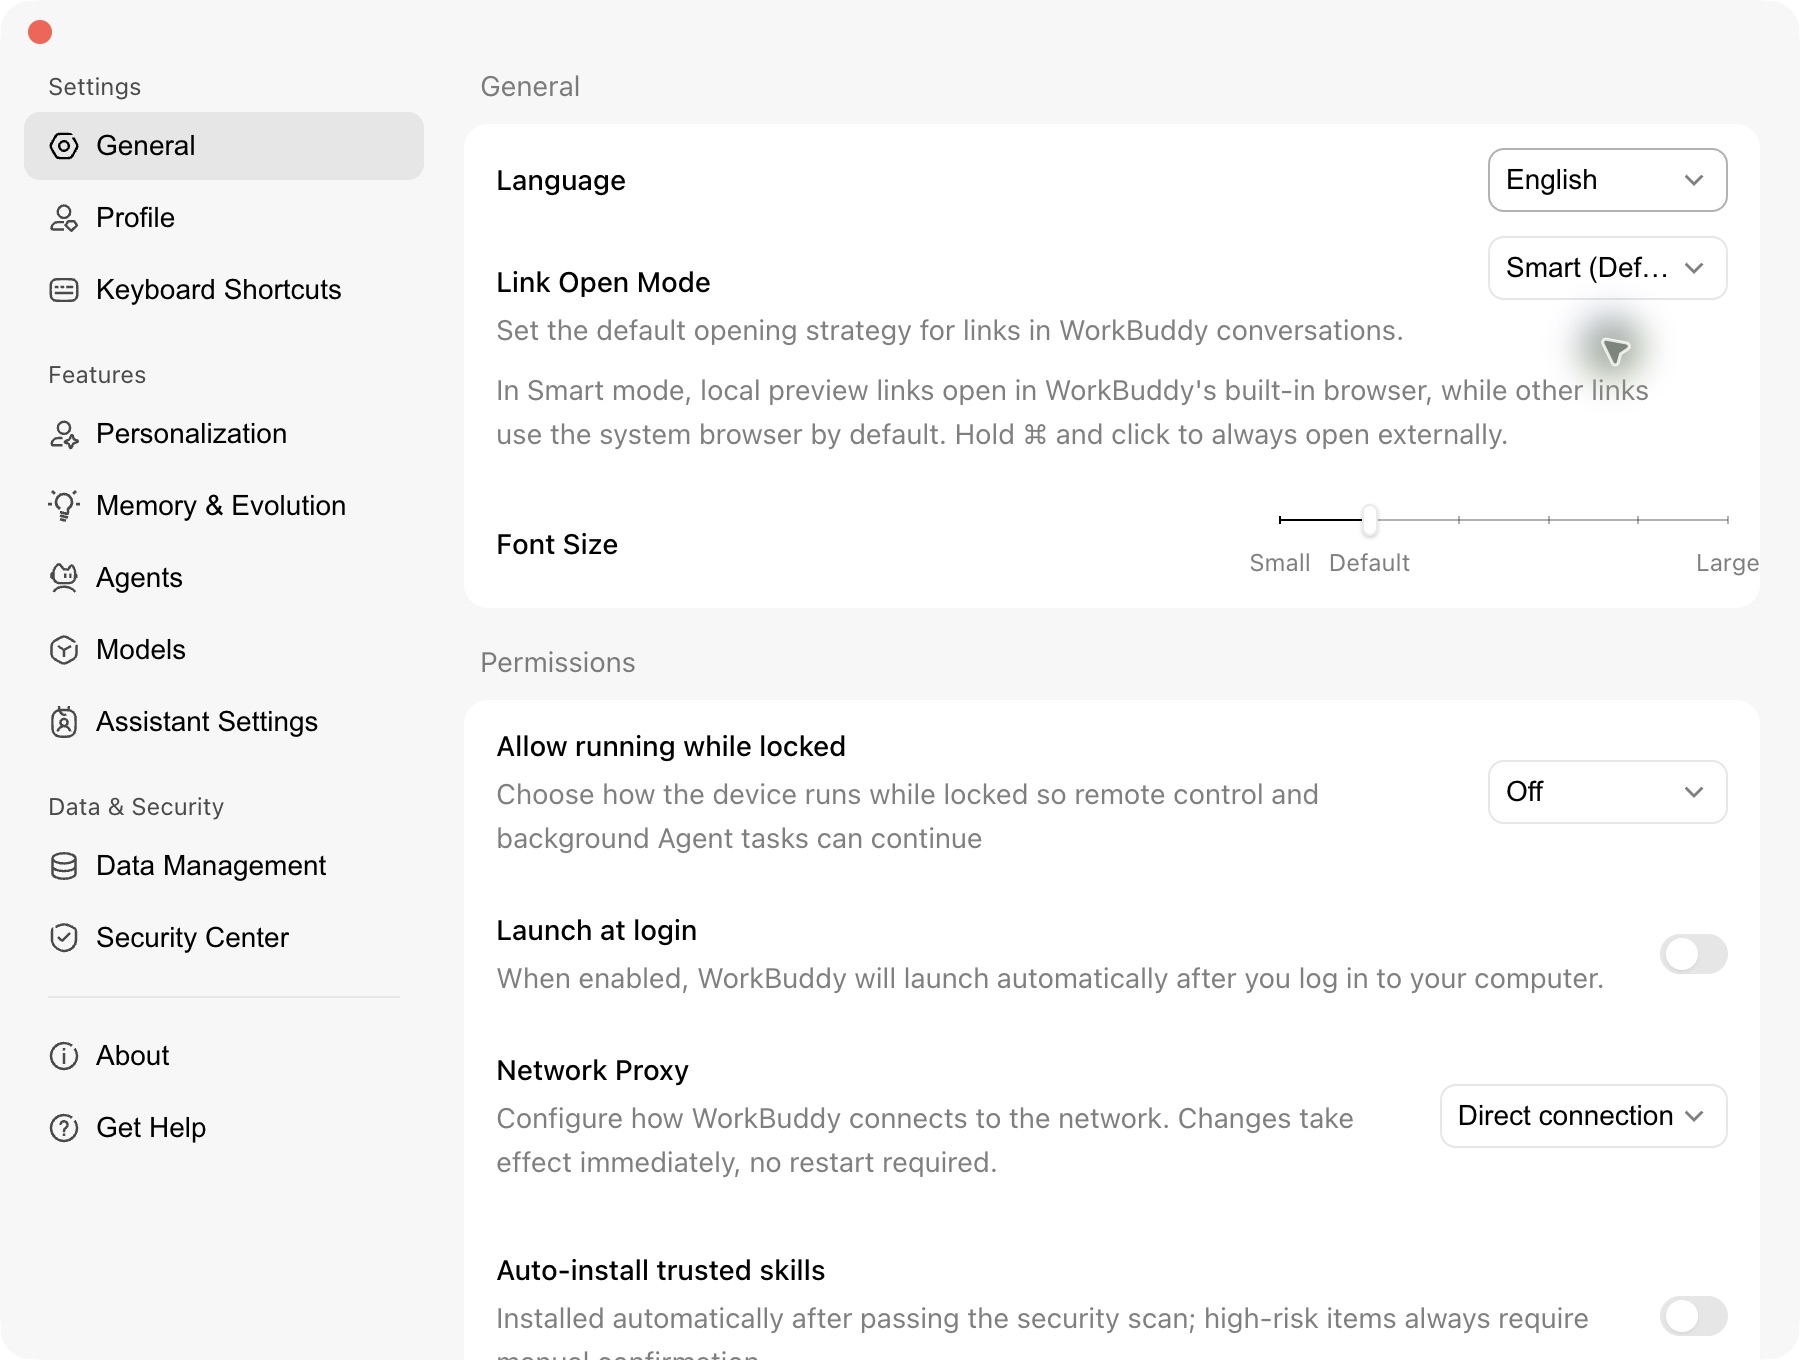
To match the screenshots, open your profile menu → Settings → General → Language → English after signing in. This keeps the same China enterprise edition. Click the image to enlarge. Attach the guide and send your first message
Click New Task → Coding. Use Coding for connecting MCP, editing the website and creating previews. Download the English MD above. In the message box, choose + → Add Files → Local Files and select
website-agent-guide-en.md.Before sending your first message, select Sol 6 (insilico-gpt-6-sol) with reasoning effort High. Keep Max Mode off: it controls conversation compression and is separate from High. Use these settings for connection, editing and previews. If the model or High option is unavailable, ask IT to confirm availability. Then copy and send the message below.
Read the attached guide completely and help me connect to our company’s website editing tools, website-publisher. Reuse the connection if it already exists. Check which websites I can access and tell me the results in English. Do not edit any website, create a preview or publish anything yet. If I need to sign in or confirm something, tell me only the next step.
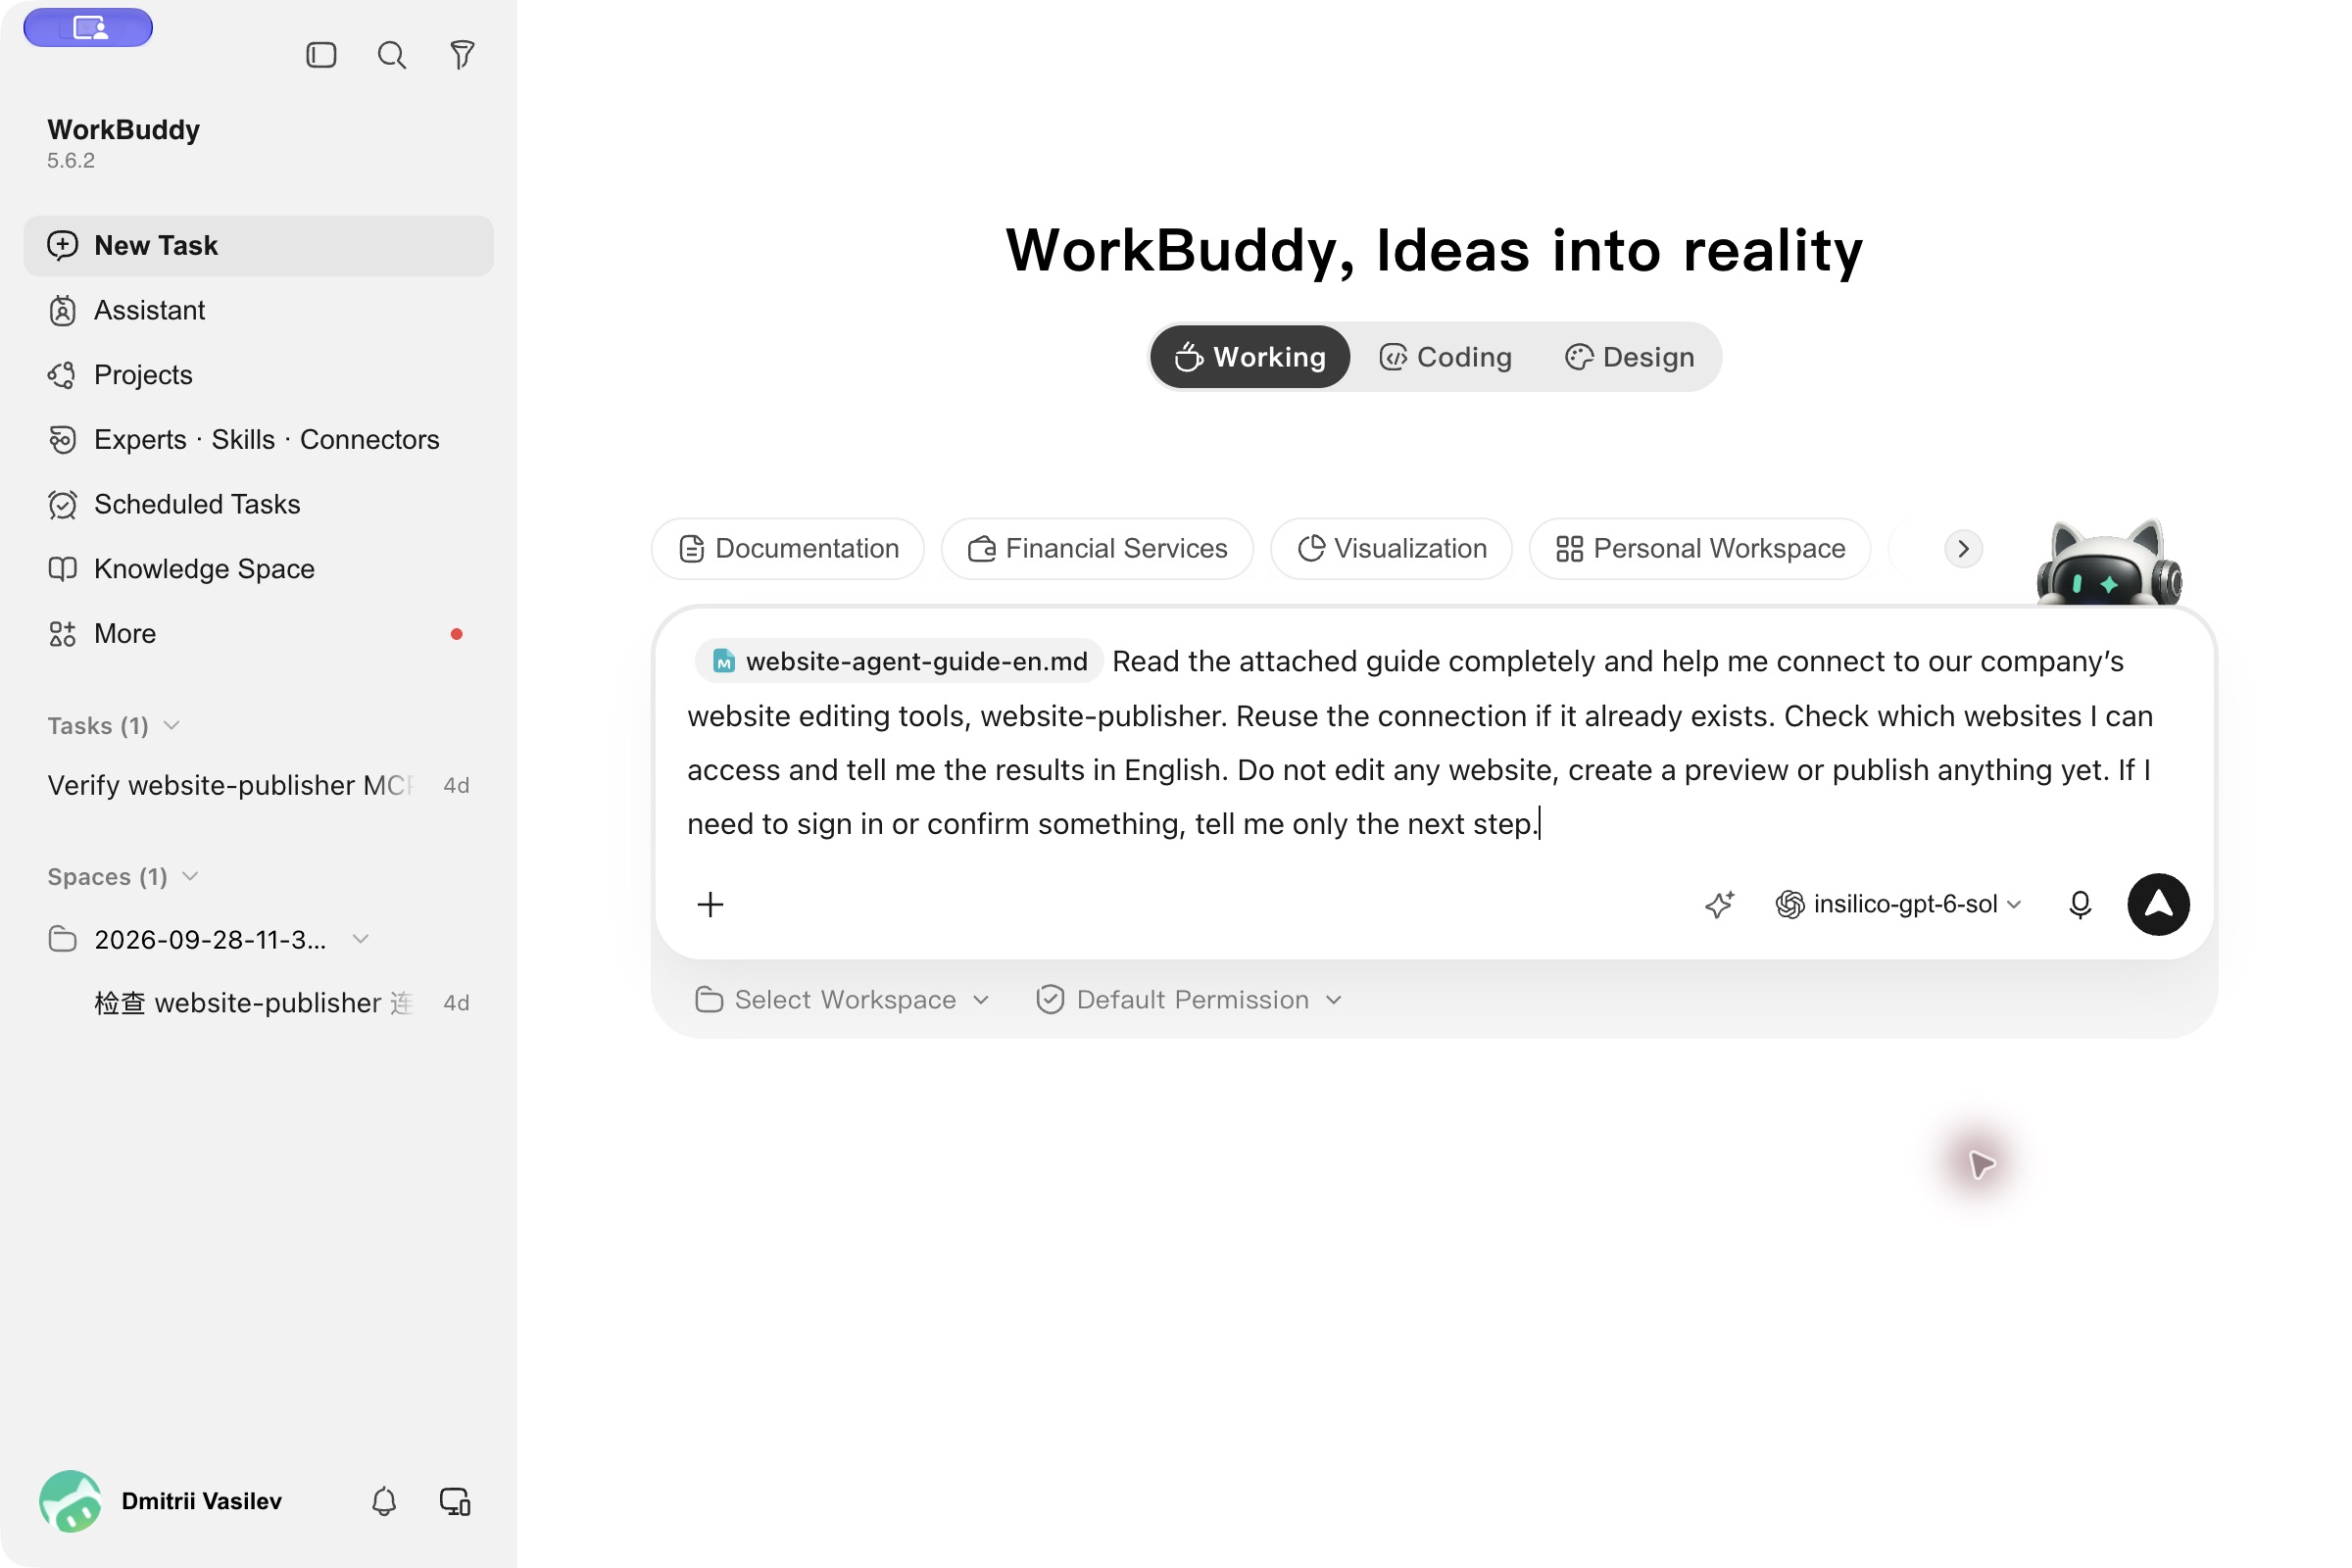
Check the MD attachment and message before clicking Send. This earlier screenshot shows Working; choose Coding as described above. Click the image to enlarge. Confirm the connection and sign in when prompted
Let WorkBuddy check for an existing connection first. If it asks you to trust website-publisher, check the server name and address shown in the manual setup below, then click Trust. Follow the actual prompts to complete company sign-in and authorization for the website editing tools in your browser.
Return to the same conversation and reply “I’ve signed in. Please continue checking.” If the tools already work without a sign-in prompt, you do not need to sign in again.
Not connected? Show manual setup
Open Experts · Skills · Connectors → Connectors → Custom connectors → Add MCP.
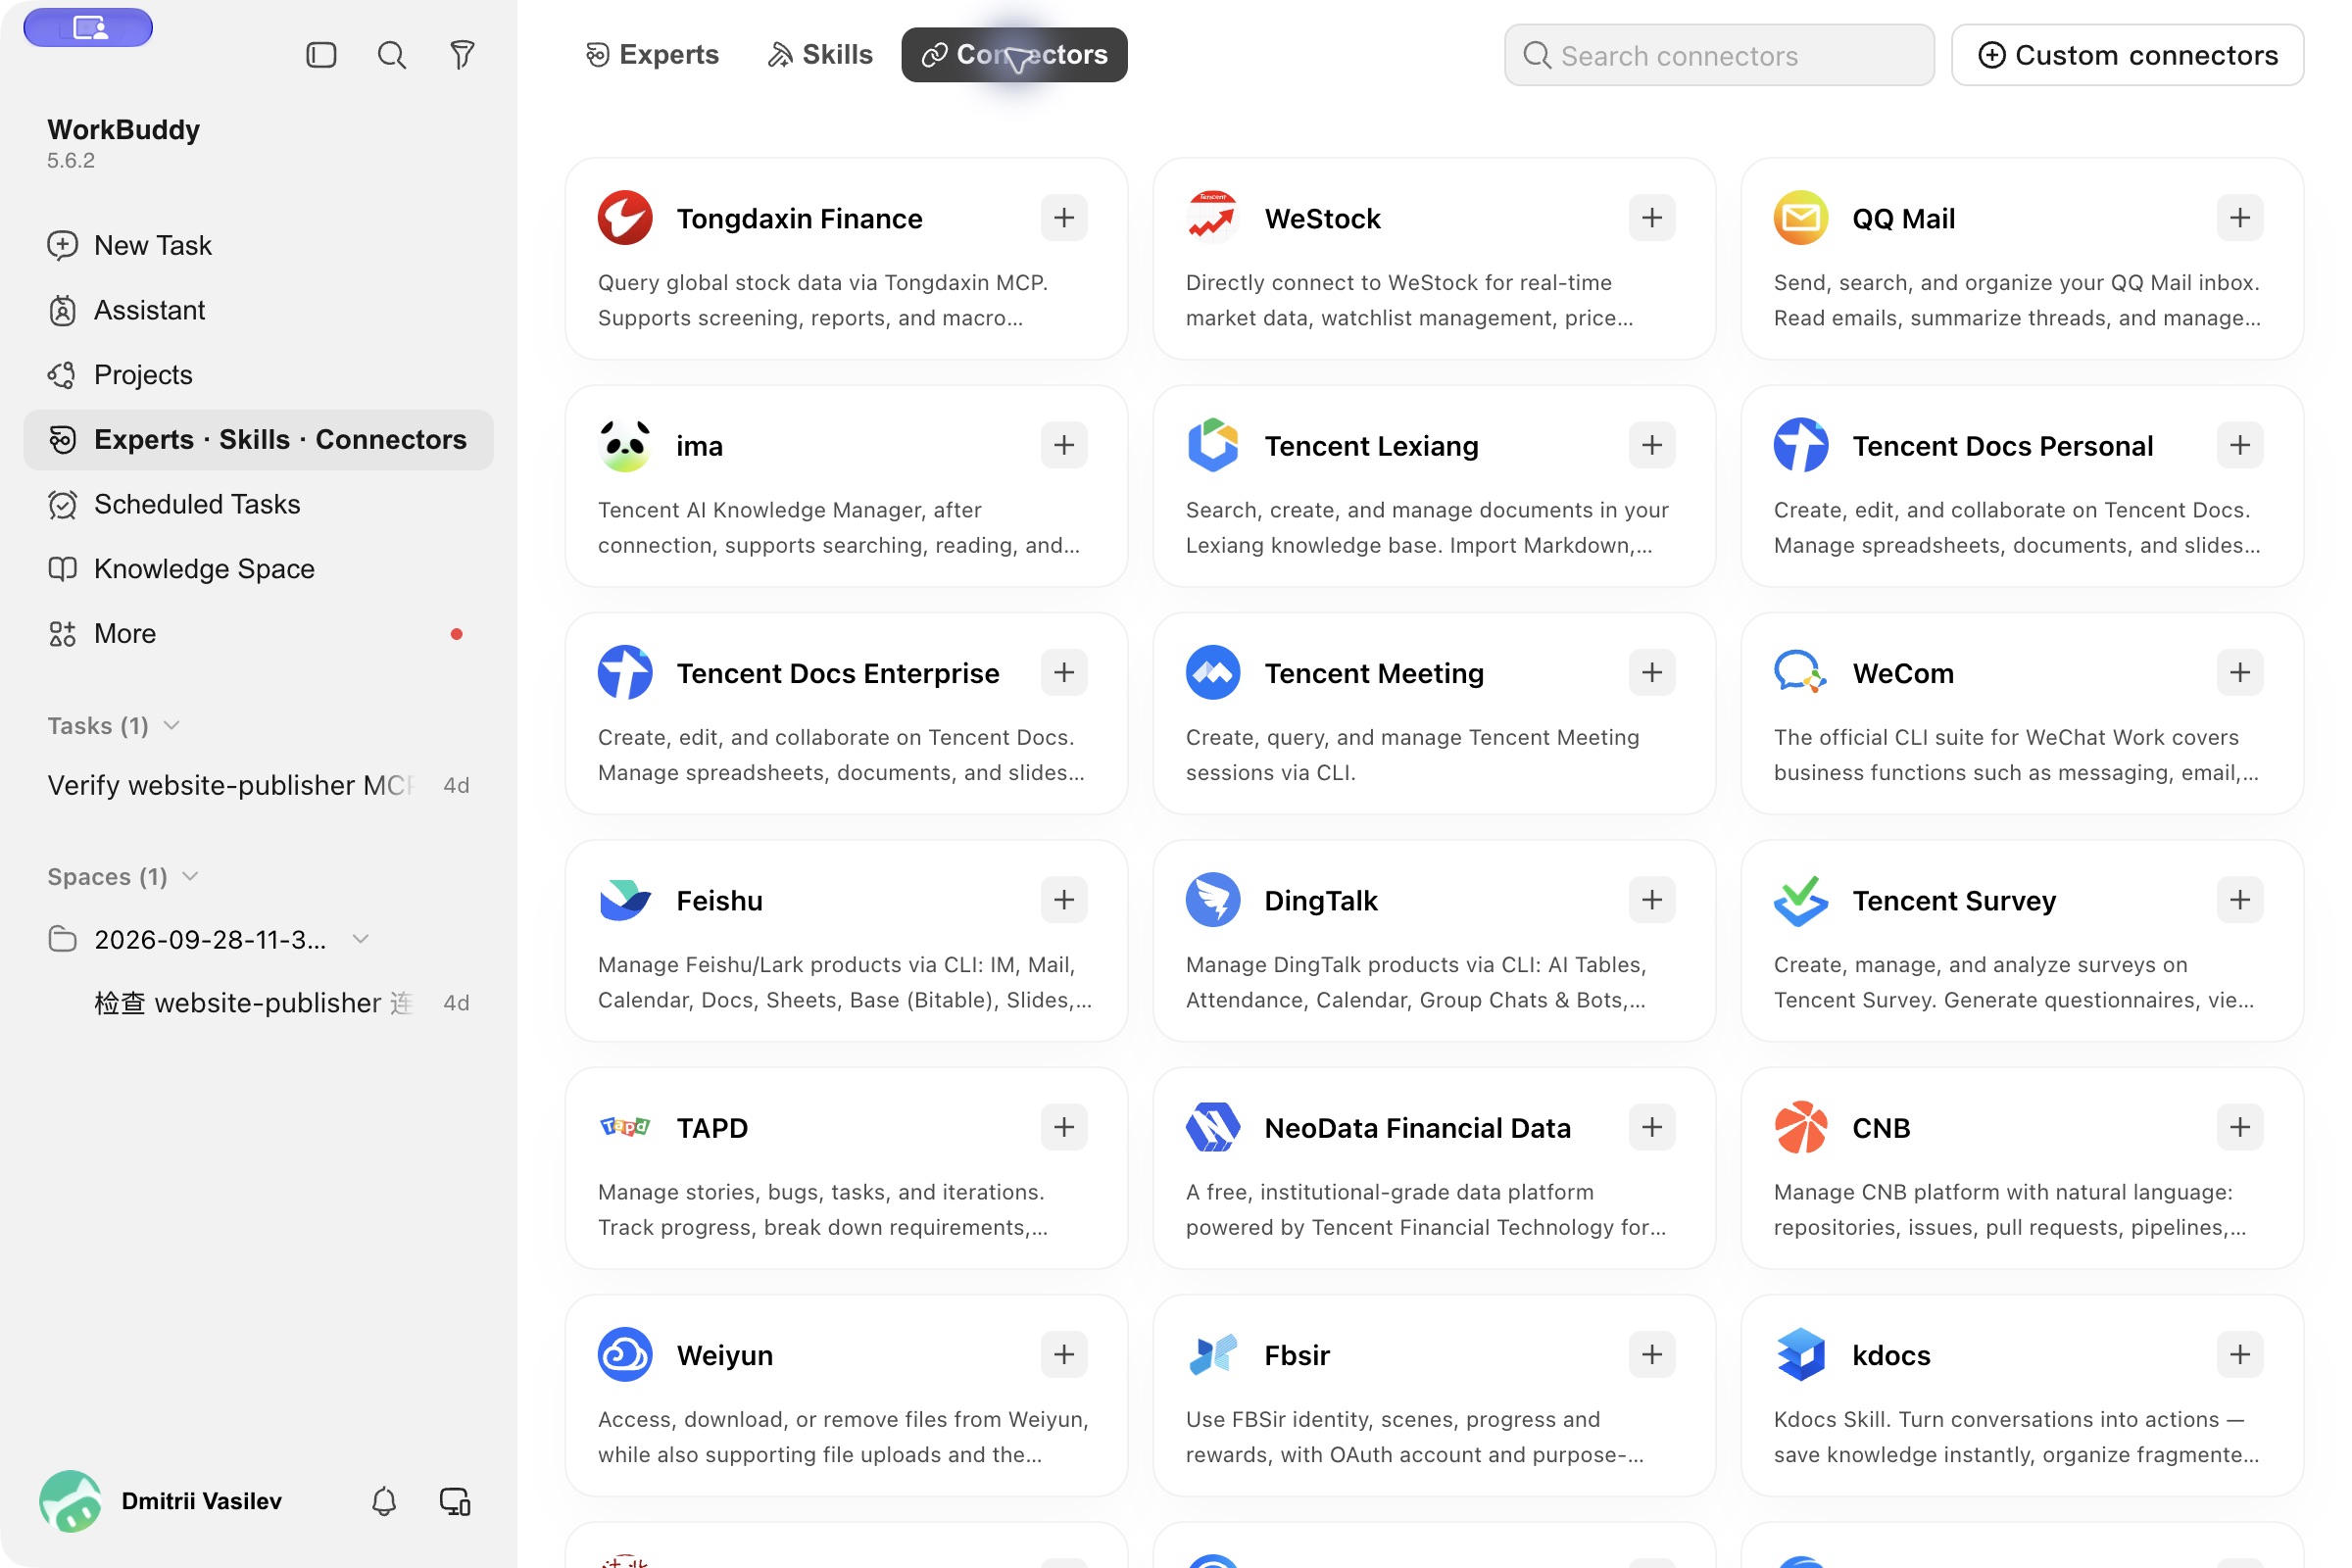
Open Custom connectors at the top right. Click the image to enlarge. Add the configuration below in the editor and click Save. If other settings are already present, ask WorkBuddy to preserve them and add only website-publisher. Reuse an existing entry with the same name.
{
  "mcpServers": {
    "website-publisher": {
      "type": "http",
      "url": "https://insilico-publisher-mcp.insilicomedicine-enterprise.workers.dev/mcp"
    }
  }
}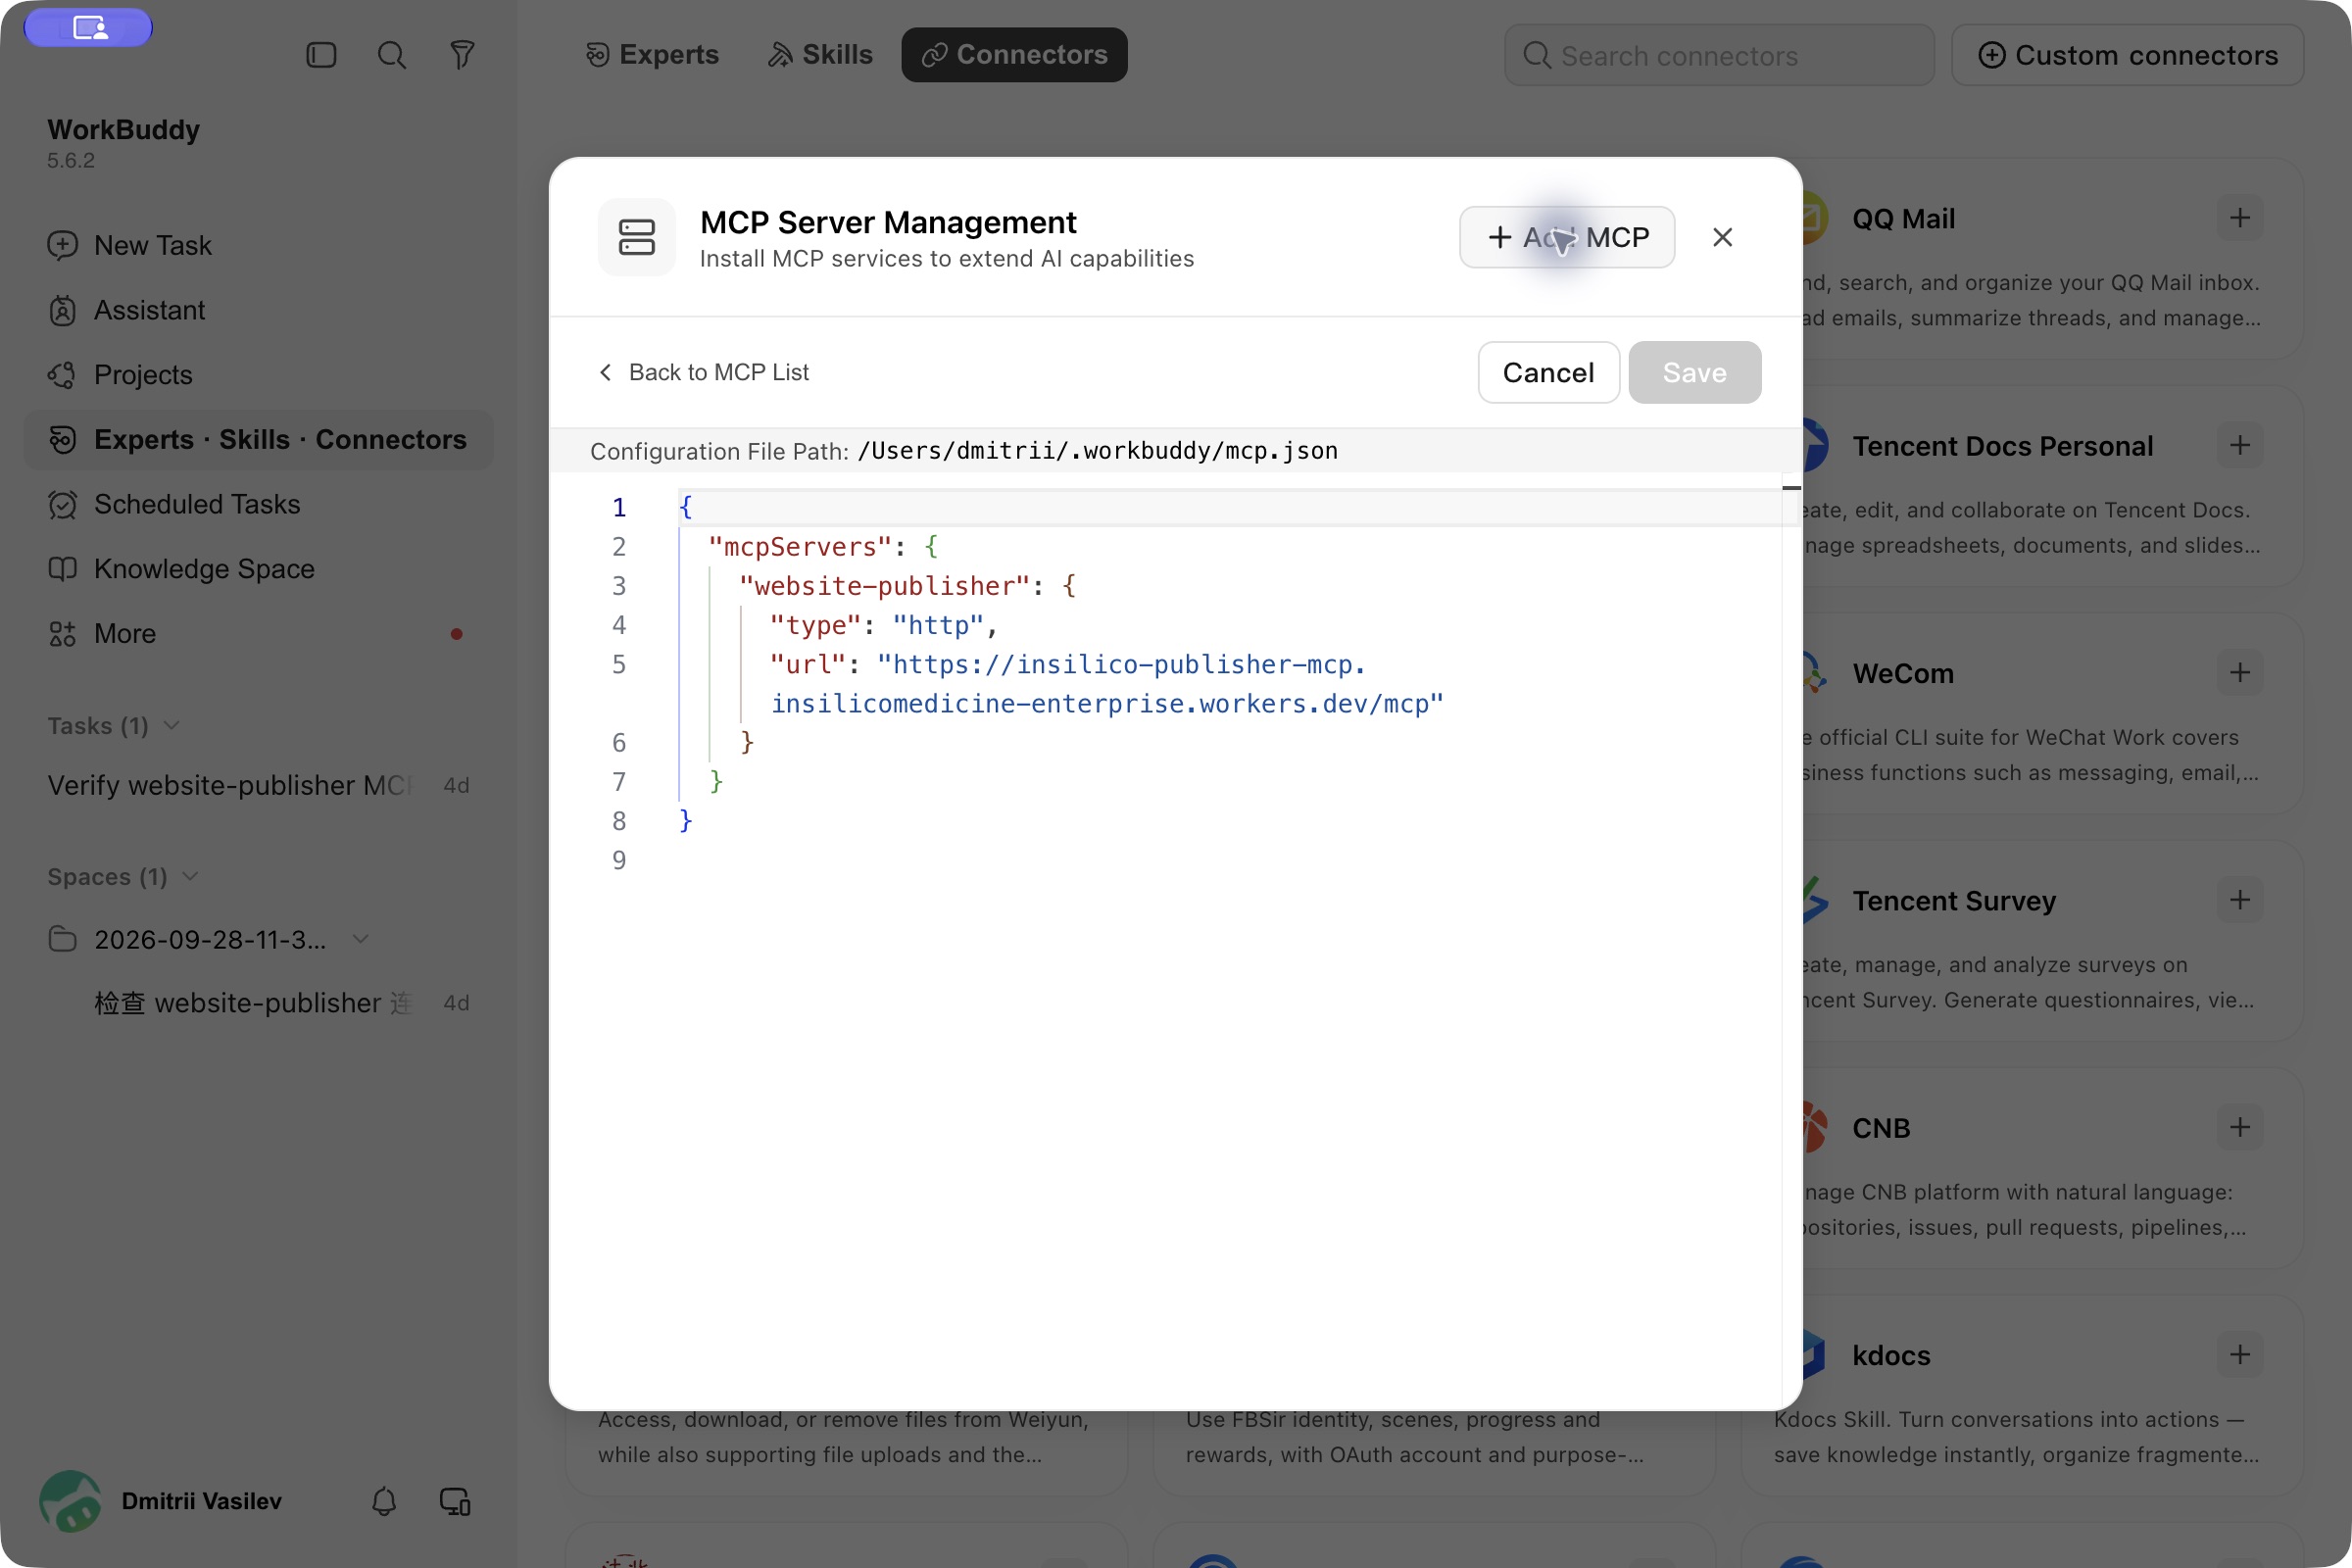
Example of an existing connection. Save is disabled in this screenshot because no changes have been made. Click the image to enlarge. After saving, follow any trust and sign-in prompts for this connection. Saving the configuration alone does not prove you can access a website. Continue to step 5.
Check the websites you can access
WorkBuddy should list your available websites and permissions in English. You may see insilico.com, pharma.ai or agingpharma.org, depending on your actual access.
If the website you need is missing, ask the website administrator to grant access to your company account. You do not need to reinstall WorkBuddy.
A green status dot alone is not enough. Confirm that WorkBuddy successfully returns your website list.
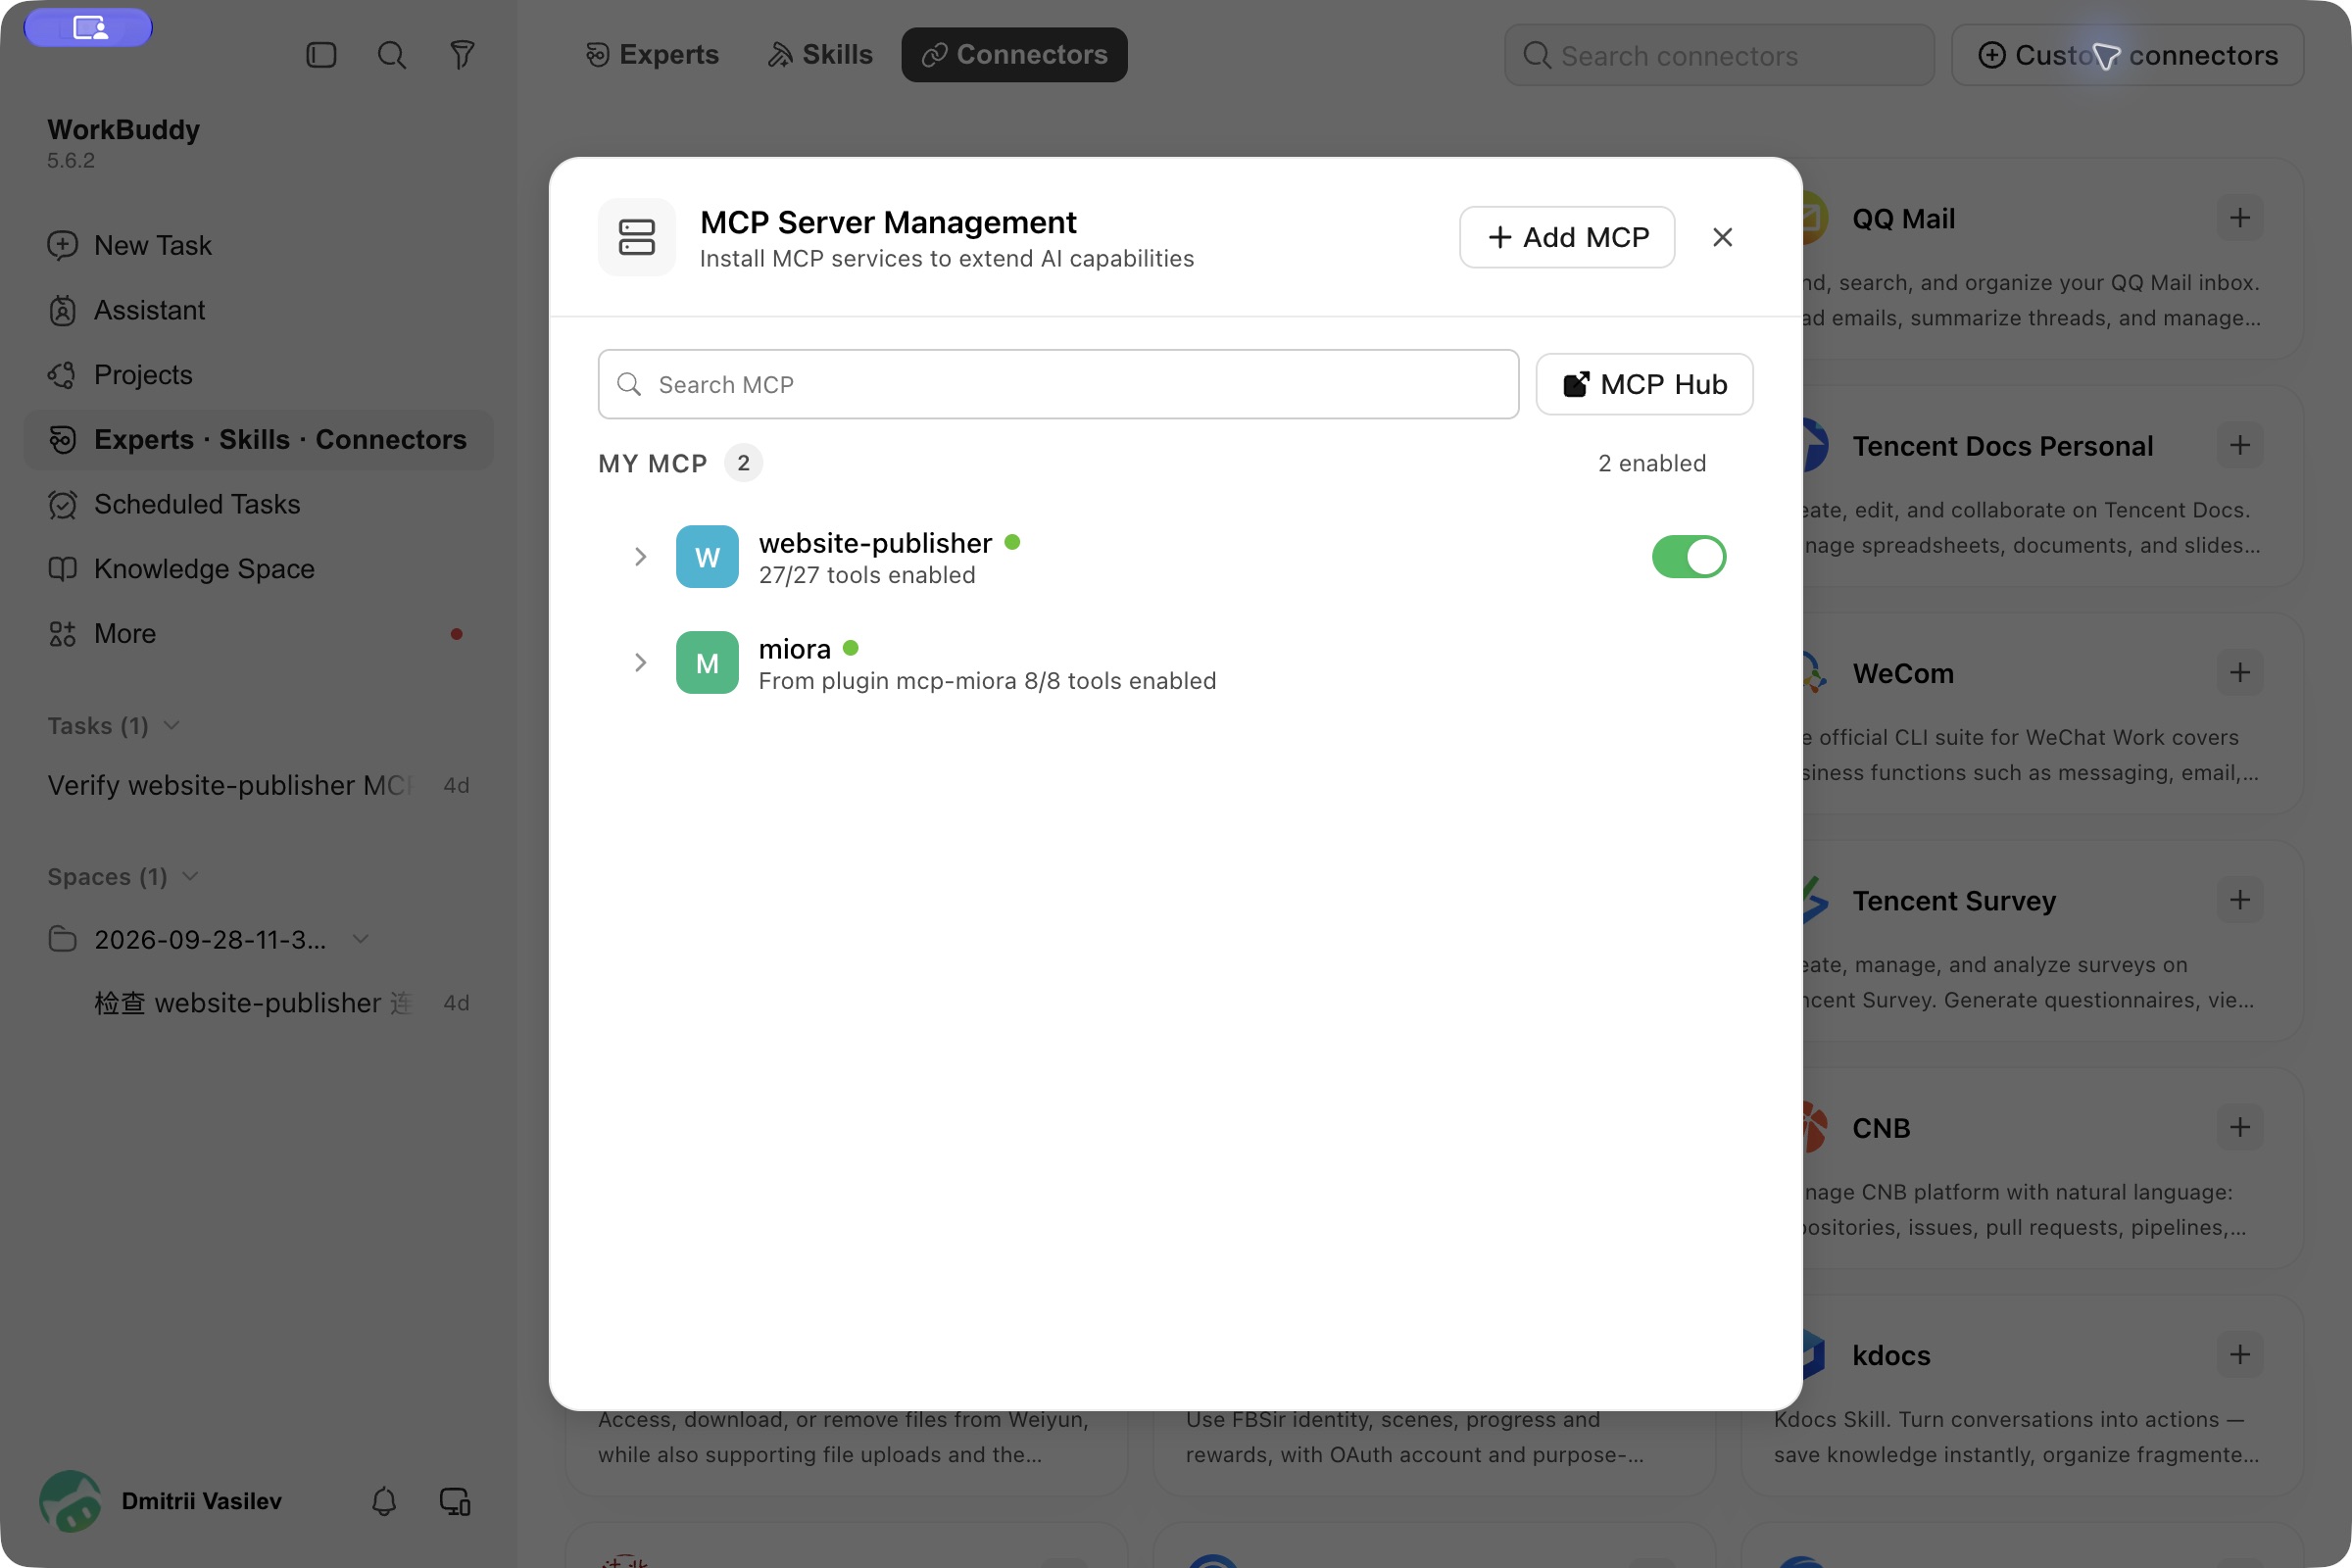
The green website-publisher status means the connection is loaded. Next, ask WorkBuddy to list your websites in the conversation; a green dot alone does not confirm your permissions. Click the image to enlarge. Describe a change and open the preview
Continue in the same conversation. Add the page link and your final text, image or document. Replace the parts in brackets:
Follow the attached guide to edit [page link]: replace [original text] with [new text], keeping everything else unchanged. Send me a one-click preview link to the changed page first. Wait for my approval before publishing.
For a new press release, attach the Word and original banner to one message in Coding, using Sol 6 + High, Max Mode off. Reuse an existing configured Publisher Files helper. If it is missing, ask WorkBuddy to complete the one-time Publisher Files 0.5.2 setup using the MD guide; a rule refresh alone does not install it. Once configured, the banner can be uploaded automatically without a separate CMS upload.
Create a new English press release on insilico.com using the complete attached Word document. Preserve the text, headings, paragraphs, emphasis and links. Use the original image attached to this same message as the banner. Set the display date to [YYYY-MM-DD] in [UTC offset]. Reuse the configured Publisher connections and follow the current guide. Send me the direct preview link as soon as it is ready, including the complete text and banner. Do not ask me to upload the banner separately in the CMS. State that it is unpublished and wait for my approval before publishing.
Measured on 12 October 2026 in WorkBuddy 5.7.7 for macOS with the same Word, banner, request and Sol 6: first preview in 3m28s in Coding, versus 5m35s in Working. Task completion was 5m21s versus 8m11s. This single comparison is not a promised response time; Windows verification is pending.
Open the preview and check the result. Direct previews for ordinary HTML pages are supported on all three websites above and do not require another sign-in. The live website has not changed yet.
You can share the preview with colleagues reviewing the change. Anyone with the link can view the draft, so keep it within the review group.
Approve this preview, then publish
Once you have checked the text, images and links, send this in the same conversation:
I approve this exact preview. Please publish it and check that the live page has updated.
WorkBuddy should return the live page link and the verification result. If you want more changes, describe them first and review a new preview before approving publication.
Need help?
403 / No authorization to use the client
If this happens while signing in to WorkBuddy, ask IT to check the China enterprise edition, your company email and your license. Share the error screenshot and the step where it happened. Keep passwords and sign-in codes private.
Blank browser page or no sign-in window
Start a fresh sign-in from WorkBuddy. Tell WorkBuddy what happened. If IT needs to help, share the error screenshot and the website’s domain, rather than a full sign-in callback URL. Copying an old callback between browsers can break the sign-in flow.
Connection saved, but no websites appear
Ask WorkBuddy to check the actual website-publisher connection. Complete any sign-in prompt it shows. If a website list appears but one site is missing, ask the website administrator for access. Reuse the existing connection.
Preview asks for activation or will not open
The preview does not open, or it takes two steps to open. Please retrieve the existing preview again and use the directPreviewUrl returned by the service to give me one working link directly to the changed page. Do not recreate the changes or publish anything.
Do I need the ZIP skill?
Start with the English MD attachment in WorkBuddy. The ZIP installation instructions on this site are for Codex and Claude Code; ZIP installation in WorkBuddy has not been verified. Attaching the MD does not automatically install a connector or grant website access.
Updated 12 October 2026 · Coding is the default recommendation. Earlier English screenshots use WorkBuddy 5.6.2 for macOS; the Word + banner comparison used 5.7.7. Existing-connection access checks and previews have been observed. Fresh-account setup, publication and Windows end-to-end verification are not certified by this walkthrough. Button positions may differ.
Connect with the guide
Download the MD file, attach it in this app, and ask the agent to read it and connect website-publisher. Complete corporate sign-in if prompted; ask it to list the websites you can access.
The agent verifies access by reading the websites available to your signed-in identity. The guide can configure the connection, but it does not grant website permissions.
See the editing and preview workflowUse the skill for repeat edits
Codex: extract the website-mcp-editor folder into ~/.agents/skills/ for your user, or .agents/skills/ in the project. Invoke it with $website-mcp-editor.
Keep SKILL.md and its supporting folders together. Check for an existing installation before copying. These paths are for local sessions; managed or cloud clients may require administrator setup. If the skill is not discovered, start a new session and check your client’s documentation.
Install skillClaude Code
Download agent instructionsConnect with the guide
Download the MD file, attach it in this app, and ask the agent to read it and connect website-publisher. Complete corporate sign-in if prompted; ask it to list the websites you can access.
If the connection is missing, your agent gives you or runs the exact setup command for local Codex or Claude Code. After first-time setup in Claude Code, fully quit Claude (⌘Q on Mac; closing the window is not enough), reopen it, and return to the same Code conversation. You do not need to create a new chat or attach the guide again. Enter /mcp there and confirm website-publisher appears before clicking Connect.
See the editing and preview workflowUse the skill for repeat edits
Claude Code: extract the folder into ~/.claude/skills/ for your user, or .claude/skills/ in the project. Invoke it with /website-mcp-editor.
Keep SKILL.md and its supporting folders together. Check for an existing installation before copying. These paths are for local sessions; managed or cloud clients may require administrator setup. If the skill is not discovered, start a new session and check your client’s documentation.
Install skillA little help,
if you need it.
The instructions handle the technical details. You only need the next step.
What is MCP, and how do I connect?
MCP is the connection that lets your agent use Insilico’s website-editing tools. The downloaded guide contains the approved website-publisher name, address and clean-machine setup.
If the connection is missing, your agent gives you or runs the exact setup command for local Codex or Claude Code. After first-time setup in Claude Code, fully quit Claude (⌘Q on Mac; closing the window is not enough), reopen it, and return to the same Code conversation. You do not need to create a new chat or attach the guide again. Enter /mcp there and confirm website-publisher appears before clicking Connect.
The agent verifies access by reading the websites available to your signed-in identity. The guide can configure the connection, but it does not grant website permissions.
How do I replace images?
Attach the same guide and describe the image change. Your agent reuses working file transfer in Codex or Claude Code and sets up an alternative only when needed. You do not need a second instruction file.
If Publisher Files is needed, your agent prepares the supported setup and only the images you supplied. You complete any required permission prompt and corporate sign-in. The approved Claude Code restart and same-conversation flow stays the same.
Publisher Files requires local Node.js 20+. Version 0.5.2 adds desktop WorkBuddy setup, including Windows support; the Word + banner flow has been checked on macOS, with Windows verification pending. A working direct transfer in Codex does not require this companion.
Manual setup fallback · ZIPThe preview doesn’t open. What now?
Tell your agent: “The preview doesn’t open. Please check it and send a working direct link to the changed page.” Don’t approve a page you haven’t reviewed. You can share the preview link with colleagues and managers involved in the review. Anyone with the link can view the draft, so avoid posting it publicly.
Which websites can I edit?
One website-publisher connection can provide several approved Insilico websites. Your corporate identity determines which ones appear and whether you can edit or publish them. A public website link alone does not grant access.
Do I need a new guide after a Publisher update?
No, not for ordinary server updates. At the start of a task or when continuing one, your agent reads the current rules through get_workflow. It also checks for a changed rules version. You do not need to replace the MD or ZIP, reinstall a working connection, or sign in again just to refresh instructions. An open chat does not receive an instant push update.
A required update to the local Publisher Files helper is separate. Your agent will explain it and ask before replacing an existing installation. The Claude setup, full restart and return-to-the-same-conversation steps remain unchanged.
Using WorkBuddy? Follow the illustrated setup and download the MD guide.
Use it often?
Install it once.
Install the setup guide once. Your agent gets current editing rules from Publisher through get_workflow. Routine server updates do not require a new ZIP or another attachment.
Download skill · ZIPOne package for Codex & Claude Code.
The skill is written in English and replies in your language.
- Download the ZIP and make it available to your local Codex or Claude Code session.
- Ask your agent to install it using the message below. Installation may require your permission.
- After installation, ask the agent to confirm the skill is available. MCP sign-in and website permissions are still required.
Install website-mcp-editor from this ZIP for this app. Ask before replacing an existing version. Confirm it is available.
Manual setup & how to invoke it
Codex: extract the website-mcp-editor folder into ~/.agents/skills/ for your user, or .agents/skills/ in the project. Invoke it with $website-mcp-editor.
Claude Code: extract the folder into ~/.claude/skills/ for your user, or .claude/skills/ in the project. Invoke it with /website-mcp-editor.
Keep SKILL.md and its supporting folders together. Check for an existing installation before copying. These paths are for local sessions; managed or cloud clients may require administrator setup. If the skill is not discovered, start a new session and check your client’s documentation.